Thursday, August 20, 2009

Bifstro Marin-Aylmer Québec


- Steak and Seafood-Charming, intimate restaurant in the heart of the historic old Marina area of Aylmer with deck overlooking the Parc de l'imaginaire and Lac des Chênes.

Heard good things so we decided to check it out. Arrived on a busy Friday night. Service was very good which was surprising with the number of people there.

Started with scallops wrapped in bacon. Five or six ?? Broiled scallops wrapped with nice almost crisp bacon. Cooked perfectly. Delicious!

I ordered the Rib eye rare. It came accompanied with home pommes frites and grilled vegetables. The steak was cooked perfectly and the portion seemed larger than the 12 ounce indicated on the menu. This steak was obviously procured from the local butcher. It was about an inch thick and didn't look at all like the same standard steak you get at the chains in Ottawa. It was tender moist and full of flavour from the grill. It was lightly seasoned with Montreal steak spice. The frites were home cut and superb. Crisp and flavourful. The vegetables were grilled to perfection. Not overdone, crisp and still slightly crunchy. The best steak I've had in the area.

Birthday girl ordered the linguini and it surpassed expectations. Fresh pasta al dente with 3 huge sea scallops and a generous amount of large shrimps grilled to succulent perfection in a rich creamy garlicky Alfredo sauce. The accompanying vegetables were also beautifully done. Leftovers came home for lunch next day. A great location, excellent service and great food served in generous amounts. If you want above average steak and seafood this is the place. The secrets out!

The Bifstro Rib Eye $22, 95
Seafood Linguini Alfredo $23.95
Scallops Wrapped in Bacon $9.50


Le Bifstro Marin
11 Front Street
Aylmer, Qc
http://pages.videotron.com/bifstro/EN/indexE.html

Wednesday, August 19, 2009

Sesame Dipping Sauce


I had a craving the other night for that sesame dipping sauce you get at a teppanyaki restaurant. You know, the one they serve with your steak and wish you could "drink" when no one is watching? YEP..that ONE!

Well I played around with it and it's actually almost a copy cat of the sesame sauce at Japanese Village....Maybe even better

2/3 cup (or more) white sesame seeds, toasted in a pan over med heat until just golden brown
1 teaspoon dry mustard

1 teaspoon of Dijon mustard
2 tablespoon of water..or more
1/4 cup of low sodium Kikkoman soy sauce. **Do not substitute**
2/3 cup vegetable oil
1 clove of garlic minced
1/2 cup white onion, finely chopped

2-3 tablespoons of sugar
2-3 tablespoon of rice vinegar
A squeeze of lemon juice
Put everything in the blender until smooth. You would normally serve this with grilled beef or shrimps, great for dipping fresh salad rolls. The possibilities are endless.
***Please keep in mind that I don't really measure all the ingredients, I just gave you guide lines and you add or modify the recipe to your liking. As an example if you did not have rice vinegar on hand, substitute with just lemon juice.

Thursday, August 13, 2009

Atelier

This year for his birthday, I took my better half to Atelier in Ottawa. There is no advertisement whatsoever for this Establishment, only an address. One might have trouble finding the location, as it is relatively inconspicuous. The building is well....Butt ugly! And that is part of the whole concept. Once inside, it gives the impression of a lab. I found the design of the space to be a little on the sterile side, but that became unimportant in light of the food, the company and the welcome we received.


NOTE: Atelier is a blind tasting menu. you are presented with unknown dishes and given a autographed menu at the end. Every dish coming out of the kitchen was greeted with anticipation, surprise and amazement. Atelier is not a place for kids, fussy eaters or rookie foodies. This is a place for those who are not afraid to experience and discover new taste, new texture that will most certainly stimulate your taste buds and your mental palate.

The food is very contemporary, with liberal use of ultramodern technologies and appliances (liquid nitrogen, anti-griddle, sous-vide...) To me this was 2 in 1; Dinner AND a show!


The Dining Room


The Kitchen. See, No Appliances!!


Sour Cream & Onion Chip Flavored Bread


"Choose your weapons"

Choose Your Weapon (Strawberry and Rhubarb)

Depending on what "weapon" you picked, you received a different interpretation of this dish.
I chose the spoon that was equipped with a cork s test tube, containing ground pistachios. I received a warm custard with liquid nitrogen frozen strawberry and rhubarb noodles. To eat, you empty the spoon's contents onto the custard and dig in!


NACHOS!

Interpretation of this dish combines both sweet and savory elements and acts as a bridge between the main course and dessert portion of the meal. It is a New York style cheesecake with a tortilla chip shortbread base, old cheddar cheese, salsa meringue, avocado purée, dehydrated olives, jalapeno powder and sour cream ice cream.

Elvis Truffle
Birthday Boy with a sore finger :-)
Banana wrapped in peanut butter wrapped in white chocolate coated in bacon crumbs...Need I say more?


Wild arctic muskox from Nunavut done sashimi style, marinated in tamari, sauteed erengi mushrooms in garlic and butter, dehydrated onion, and the green leaves on top are white lamb's quarter. As you can see, I took a few bites before I remembered to take a picture..OOPS!


Pork Belly

It was cooked sous vide at 82°C for 9 hours. Then it was marinated in a caramel sauce and sauteed. Each piece was served with a raw apple relish with jalapeno, snow peas, a piece of textured puree of snow peas, and a cube of purple potato. ...Again, this picture was taken after I attacked this plate.


The tuna dish was lightly seared Albacore tuna with Atelier’s own lovely Tagoroshi spice blend. This was served with a lime, ginger + radish gel, green beans, dried nori (seaweed), cucumber salsa, cucumber jelly, toasted Brazil nuts, fleur de sel, and pickled ginger.


Pear and horseradish soup with a dollop of whipped elderberry. Milkweed was clipped to the spoon. It was delightful! The aroma you received with every spoonful really surprised me.


Lobster with black truffle on black truffle oil pancakes, sauteed cinnamon mushrooms, the yellow lines are eggs cooked sous vide, watercress mango with dehydrated leek and topped with a chardonnay foam.


We also had ostrich, cooked sous vide, Yukon gold mashed potatoes, asparagus and marinated beet. Well, I was so excited that I forgot to take a picture of that one...


CSI; A murder scene investigation. Blood splattering of strawberry puree, strawberry dots. the murdered body was covered with a chocolate blanket. A police tape of yellow corn, sour cream ice cream, cornbread something, and cornbread puddled. Quite the imagination going on in the kitchen!


This was by far the most memorable meal I have ever had.


Thursday, July 30, 2009

Daring Cooks-Dumplings

June's Daring Cooks Challenge was Chinese Dumplings/Potstickers (aka gyoza in Japanese)

I love the Dumplings, they are fast to cook, they freeze well and taste amazing. It's the perfect food when you come home late from work and don't know what to make for dinner. Just take a few out of the freezer and you have a quick tasty snack! There is countless different recipes for Dumplings.

Below is the daring cooks recipe. I tweeked mine a bit and will let you in on a secret...I add a cup or more of semi-firm tofu to my meat mixture. It makes it smoother, and less dry. Also, I am lucky enough to live in a city that has a large asian community. I can get all the hard to get ingredients in Chinatown. For example, I added chinese chives to my mixture. It it very powerful in taste/smells similar to garlic. The sky is the limit with dumplings, you include what you like and what is available to you. The key however is to use meat that is fatty and not lean. Ground pork that is too lean will make a very dry dumpling. Oh! I also added some hoisin sauce and a dash of soya sauce.


Pork filling:

1 lb (450g) ground pork

4 large napa cabbage leaves, minced

3 stalks green onions, minced
7 shitake mushrooms, minced (if dried - rehydrated and rinsed carefully)
1/2 cup (75g) bamboo shoots,
minced 1/4 (55g) cup ginger root,
minced3 tbsp (40g) soy sauce
2 tbsp (28g) sesame oil
2 tbsp (16g)
corn starch

OR

Shrimp filling:
1/2 lb (225g) raw shrimp, peeled, deveined, and coarsely chopped
1/2 lb (225g) ground pork
3 stalks green onions, minced
1/4 cup (55g) ginger root, minced
1 cup (142g) water chestnuts, minced
1 tsp (5g) salt
3 tbsp (40g) sesame oil
2 tbsp (16g) corn starch


Now, the challenge was to make your own dumpling skins. It does not work very well, so I used store bought instead. Make sure it does not contain eggs, those would be wonton wrappers.

Combine all filling ingredients in a large mixing bowl and mix thoroughly (I mix by clean hand). Cover and refrigerate until ready to use (up to a day, but preferably within an hour or two).

For the wrapping method, I suggest you go see this month host for the instructions, . Trust me you will get better with practice.. http://userealbutter.com/2007/10/04/chinese-dumplings-and-potstickers-recipe/ and http://userealbutter.com/2009/06/14/chive-dumplings-recipe/


To pan fry (potstickers): Place dumplings in a frying pan with 2-3 tbsp of vegetable oil. Heat on high and fry for a few minutes until bottoms are golden. Add 1/2 cup water and cover. Cook until the water has boiled away and then uncover and reduce heat to medium or medium low. Let the dumplings cook for another 2 minutes then remove from heat and serve

To freeze: Assemble dumplings on a baking sheet so they are not touching. It helps to rub the base of the dumpling in a little flour before setting on the baking sheet for ease of release. Freeze for 20-30 minutes until dumplings are no longer soft. Place in ziploc bag and freeze for up to a couple of months. Prepare per the above instructions, but allow extra time to ensure the filling is thoroughly cooked.

My favorite dumpling dipping sauce: -Chinese red vinegar with chopped ginger


Thursday, June 25, 2009

My Picker Upper

When I am sad or having a horrid day, I watch my favorite commercial in the whole world :-)
To me this is a heart warming clip with genuine characters that don't look like actors. I simply love it.

http://adsoftheworld.com/media/tv/washington_lottery_birds

Friday, June 19, 2009

Rhubarb & Strawberry Pie

I am not a big fan of pies, but this one, I adore! The tartness of the rhubarb married with the sweetness of the strawberries... I'm drooling as I'm typing

Ingredients:
3 cups rhubarb stalks cut into 1/2 inch pieces, no leaves.
1 cup sliced strawberries
1 cup sugar
3 Tbsp of all purpose flour (to thicken)
1/4 teaspoon of salt
1 teaspoon of grated orange or lemon peel (optional, but very good)
2 9 inch pie crusts. I used tenderflake frozen deep dish pie shells, and I'm not ashamed!

Instructions:
1- Preheat oven to 400°F. Mix the rhubarb and the strawberries with the sugar, flour, salt, and orange rind. Let sit while your oven is heating. The sugar & salt will bring out the colors and juices out of the fruits.

2- I gave the mixture another good stir just before pouring into the pie shell. Top pie with second pie shell. Seal well, and crimp if desired. I also brushed an egg wash on the top crust to give it that golden glow. just beat an egg with a drop of milk, cream or water... Make vents/slits to let steam escape will cooking.


**I strongly suggest that you put a pan/cookie sheet underneath the pie to catch the juices. Trust me !I am glad I have a self cleaning oven..it was not pretty.

3- Bake at 400°F for 20 minutes on middle/lower rack, reduce heat to 350°F, and bake an additional 30-40 minutes longer.Cool on a rack. Serve warm or cold. As the pie cools down, the juices will thicken..


I loved this pie so much that I think I will make several and freeze them uncooked.

Friday, June 5, 2009

Clogged Bathroom Sink

We purchased our home almost a year ago. The kitchen and bathroom are both very modern, but still beautiful and warm. I especially love my bathroom sink, as you can see, it's shaped like a bowl...The only glitch is that it has been "clogged" ever since. Meaning that I have to clean the darn thing 10 times a day or live with toothpaste and other gunky stuff staring at me every time I use the bathroom. It ruins the whole look and is not very hygienic. I did not want to use Drano or other potent chemicals. I have tried pretty much everything, hot water, bleach, vinegar, tweezers...to no avail.. Then I stumbled upon this homemade concoction and VOILA! I now have a perfectly white clean sink :-) I am happy woman

Recipe:

This is the most Eco friendly recipe I have found, and the least expensive as well.

-Mix together 1/2 cup of baking soda and 1/2 of table or coarse salt. (I used regular salt) -pour down in the sink, if you can, remove the drain stopper, mine just unscrews.
-Pour about 1 liter of boiling water down the sink.
-Wait 10 minutes and open the cold water tap for a few minutes, that should clear up everything.


***They recommend to do this once a month as maintenance***

Wednesday, June 3, 2009

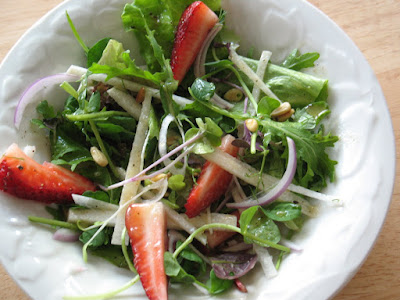
My Favorite Spring Salad

Beautiful, isn't it?


I decided to mix all my favorite salad ingredients together and came up with something amazing!I have a new love: Jicama! I simply love the freshness and crunch of that root vegetable. The taste and texture is somewhat between a potato and apple. It is perfect julienned in salads.

Here are the ingredients, however feel free to add whatever you have on hand..

-Spring salad mix
-A handful of Spring shoots, (pea, onion, beet, or whatever is available)
-Jicama, cut into matchsticks
-Thinly sliced red onion
-Quartered strawberries
-Toasted pine nuts

Friday, May 29, 2009

Knead No More!


MMMmmmm Warm Bread with Cold Butter


I attempted to make bread only once, and that was 12 years ago; it was long, painful and a disaster.... All this changed yesterday when discovered an amazing way to bake the best bread! This recipe allows anyone to effortlessly bake loaf after loaf of premium artisan goodness. Everyday . . . without kneading the dough! HEAVEN! Frankly, ACE bakery bread is good, but who can afford to pay 4$ for Artisan bread all the time??

Here's how it works:

1) It requires very little yeast;

2) the dough is very wet;

3) no kneading is required;

4) the bread rises for a long time and

5) you can use a closed, pre-heated pot for baking. Together, these factors add up to the tastiest bread I have ever baked.


Crispy Crust:

The last secret to 'Real' Bread is the baking. Professional bakers have long known that the secret of a perfectly crisp crust is moisture. Baking bread in a moist oven keeps the surface supple and allows it to stretch fully before the heat of the oven sets the crust. They also have ovens that inject just the right amount of moist steam, at just the right time.


For 1 normal loaf of french style bread

3 cups all-purpose or bread flour
1/4 tsp dry yeast
1 1/4 tsp salt
1 5/8 cups of warm water

For baking in a covered pot

  1. Whisk the dry ingredients together thoroughly in a glass, plastic or stainless steel bowl.
  2. Add the water and stir until a wet dough forms. Continue stirring until the dough incorporates all the loose flour in the bowl, about 60 seconds in total.
    Cover the bowl with a towel and rest in a warm place for 12 to 18 hours.(I sprinkle flour on top of the bread to avoid it sticking to the towel and prevent it from drying out).
  3. It will double in size, bubble and long gluten strands will form.
  4. Lightly flour your hands and the work surface then remove the dough from the bowl. Quickly form it into a ball.
  5. Thoroughly flour a cotton towel and rest the dough on it. Cover it with another floured cotton towel.
    You may also rest the dough on a non-stick ‘Silpat’ mat and cover it with just one towel.
  6. Rest the dough a second time. In 2 to 3 hours it will rise again and double in size once more.
  7. A half an hour or so before the dough is ready preheat your oven to 450 degrees. You may use cast-iron, steel, enamel or ceramic. If at all possible, warm your pot in the oven prior to putting the bread into it.
    When the dough has fully risen slide your hand under the towel and quickly invert the delicate dough into the hot pot.
  8. Shake the pot a bit to settle it then place the lid on the pot and start baking.
    Bake for 30 minutes with the lid then remove it and bake for 15 minutes more.

Wednesday, May 20, 2009

More Tulips


Green Goddess Dressing

This gorgeous recipe was provided by our Kundalini teacher, Devinder Kaur from PranaShanti Yoga Center in Ottawa. Everybody in our family raves about this dressing, maybe because we're garlic fanatics...It is a very potent delicious dressing, a little goes a long way. Perfect for a spring cleansing regime!


Ingredients;

3 garlic cloves
Juice of two lemons (approx. 1⁄4 cup)
1 cup cilantro (unchopped)
1 cup parsley (unchopped)
2 Tbsp Bragg Liquid Aminos or Nama Shoyu
1⁄2 tsp umeboshi plum vinegar
1⁄2 cup cold pressed/extra virgin olive oil
1/2 cup water

Procedure;

Blend all ingredients in a blender for 30 seconds. Chill & serve.
Yields 1 cup. Keeps in refrigerator for 5-6 days.

Sunday, May 17, 2009

Ottawa's Tulip Festival


Spring is my favorite season here in Ottawa. I went to the Tulip festival and it reminded me of how beautiful and green this city is. For those of you that are not familiar with the festival, here is a little bit of history:
The Canadian Tulip Festival has grown into the largest Tulip Festival in the world from a gift of International Friendship given six decades ago. In the fall of 1945, Princess Juliana of the Netherlands presented Ottawa with 100,000 tulip bulbs. The gift was given in appreciation of the safe haven that members of Holland's exiled royal family received during the Second World War in Ottawa and in recognition of the role which Canadian troops played in the liberation of the Netherlands.

The tulips have become an important symbol of international friendship and the beauty of spring. They also have special meaning to people of Canada's Capital Region. During the war, the Dutch royal family was hosted at Government House in Ottawa. Princess Margriet was born at the Ottawa Civic Hospital; her hospital room declared "Dutch soil" and the flag of the Netherlands flew on Parliament's Peace Tower.

The first Canadian Tulip Festival was held in 1953. The Ottawa Board of Trade, at the suggestion of world-renowned photographer Malak Karsh whose photographs have immortalized the tulip, formalized the Canadian Tulip Festival to coincide with the tulip's annual bloom. In the next 10 years the Festival grew in size, with a staggering display of over two million flowers. Each spring over 600,000 people from all over North America, Europe and Asia make over a million visits to the Canadian Tulip Festival. Studies show it has a $50 million economic impact annually on the Ottawa region. The event, which grew from the Dutch gift of friendship, has become the world's largest Tulip Festival and Ottawa, with its Official Flower – the Tulip, has become the Tulip Capital of the North America. Isn't that something Eh ! :-)


More pics to come soon....

Monday, April 27, 2009

Daring Bakers Challenge; Cheesecake

Vanilla Bean Creme Brulée Cheesecake :-)

Picture #1

"The April 2009 challenge is hosted by Jenny from Jenny Bakes. She has chosen Abbey's Infamous Cheesecake as the challenge."

I was really excited when I learned that the challenge was cheesecake.
I L-O-V-E cheesecakes. My stepdaughter makes a mean Amaretto cheesecake too...delish.

For this month challenge I tried to recreate the Madagascar Vanilla Bean Creme Brulée cheesecake I had in Toronto... I think I somewhat succeeded, not the same, but a keeper for sure. Abbey's Infamous Cheesecake:

Abbey's Infamous Cheesecake:

Crust:
1 1/2 cups Oreo crumbs
about 4 tbsp. melted butter

Cheesecake:
3 sticks of cream cheese,
8 oz each (total of 24 oz) room temperature
1 cup sugar (I used gold colored organic sugar)
3 large eggs
1 cup heavy cream
1 tbsp. lemon juice
1 tbsp. vanilla extract (I used the innards of a vanilla bean)

DIRECTIONS:
1. Preheat oven to 350 degrees F Begin to boil a large pot of water for the water bath.
2. Mix together the crust ingredients and press into your preferred pan. You can press the crust just into the bottom, or up the sides of the pan too - baker's choice. Set crust aside.
3. Combine cream cheese and sugar in the bowl of a stand-mixer (or in a large bowl if using a hand-mixer) and cream together until smooth. Add eggs, one at a time, fully incorporating each before adding the next. Make sure to scrape down the bowl in between each egg. Add heavy cream, vanilla, lemon juice, and blend until smooth and creamy.

4. Pour batter into prepared crust and tap the pan on the counter a few times to bring all air bubbles to the surface. Place pan into a larger pan and pour boiling water into the larger pan until halfway up the side of the cheesecake pan. If cheesecake pan is not airtight, cover bottom securely with foil (see note at bottom) before adding water. See Pic #2

5. Bake 45 to 55 minutes, until it is almost done - this can be hard to judge, but you're looking for the cake to hold together, but still have a lot of jiggle to it in the center. You don't want it to be completely firm at this stage. Close the oven door, turn the heat off, and let rest in the cooling oven for one hour. This lets the cake finish cooking and cool down gently enough so that it won't crack on the top. After one hour, remove cheesecake from oven and lift carefully out of water bath. Let it finish cooling on the counter, and then cover and put in the fridge to chill. Once fully chilled, it is ready to serve

OOPS! My oven mitt put a dent into the cake

***To avoid a soggy crust, I wrapped the bottom of the pan with 2 layers of plastic wrap, then 2 layers of Heavy Duty foil. After baking the cake, I removed it immediately from the water bath, peeled the foil and plastic film and put it back in the oven on a different rack. I left the water bath in the oven, to create humidity for the 1 hour rest.

Once Fully chilled I sprinkled white sugar all over the top and fired it with a blow torch, see picture # 3

Then I drizzled a caramel sauce on top, consisting of boiled sugar, water, and a bit of cream. See Picture # 1

Et Voila!

Picture #2


Picture #3

Sunday, April 26, 2009

Cashou's New 'Do

Well, it's that time again, spring time. The pets are shedding enough everyday to knit myself another pet. So it was time for Cashou to get a buzz cut. She hates those bows that PetSmart puts on her. I'm surprised they stayed long enough for me to take pics!