When I am sad or having a horrid day, I watch my favorite commercial in the whole world :-)
To me this is a heart warming clip with genuine characters that don't look like actors. I simply love it.
http://adsoftheworld.com/media/tv/washington_lottery_birds
Thursday, June 25, 2009


Friday, June 19, 2009
Rhubarb & Strawberry Pie
I am not a big fan of pies, but this one, I adore! The tartness of the rhubarb married with the sweetness of the strawberries... I'm drooling as I'm typing
Ingredients:
3 cups rhubarb stalks cut into 1/2 inch pieces, no leaves.
1 cup sliced strawberries
1 cup sugar
3 Tbsp of all purpose flour (to thicken)
1/4 teaspoon of salt
1 teaspoon of grated orange or lemon peel (optional, but very good)
2 9 inch pie crusts. I used tenderflake frozen deep dish pie shells, and I'm not ashamed!
Instructions:
1- Preheat oven to 400°F. Mix the rhubarb and the strawberries with the sugar, flour, salt, and orange rind. Let sit while your oven is heating. The sugar & salt will bring out the colors and juices out of the fruits.
 2- I gave the mixture another good stir just before pouring into the pie shell. Top pie with second pie shell. Seal well, and crimp if desired. I also brushed an egg wash on the top crust to give it that golden glow. just beat an egg with a drop of milk, cream or water... Make vents/slits to let steam escape will cooking.

**I strongly suggest that you put a pan/cookie sheet underneath the pie to catch the juices. Trust me !I am glad I have a self cleaning oven..it was not pretty.
3- Bake at 400°F for 20 minutes on middle/lower rack, reduce heat to 350°F, and bake an additional 30-40 minutes longer.Cool on a rack. Serve warm or cold. As the pie cools down, the juices will thicken..
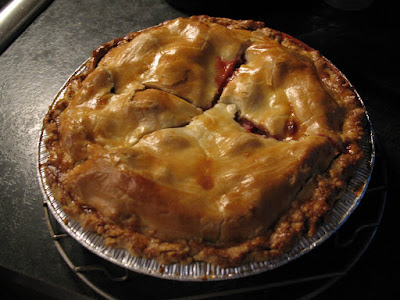
I loved this pie so much that I think I will make several and freeze them uncooked.
Ingredients:
3 cups rhubarb stalks cut into 1/2 inch pieces, no leaves.
1 cup sliced strawberries
1 cup sugar
3 Tbsp of all purpose flour (to thicken)
1/4 teaspoon of salt
1 teaspoon of grated orange or lemon peel (optional, but very good)
2 9 inch pie crusts. I used tenderflake frozen deep dish pie shells, and I'm not ashamed!
Instructions:
1- Preheat oven to 400°F. Mix the rhubarb and the strawberries with the sugar, flour, salt, and orange rind. Let sit while your oven is heating. The sugar & salt will bring out the colors and juices out of the fruits.
2- I gave the mixture another good stir just before pouring into the pie shell. Top pie with second pie shell. Seal well, and crimp if desired. I also brushed an egg wash on the top crust to give it that golden glow. just beat an egg with a drop of milk, cream or water... Make vents/slits to let steam escape will cooking.**I strongly suggest that you put a pan/cookie sheet underneath the pie to catch the juices. Trust me !I am glad I have a self cleaning oven..it was not pretty.
3- Bake at 400°F for 20 minutes on middle/lower rack, reduce heat to 350°F, and bake an additional 30-40 minutes longer.Cool on a rack. Serve warm or cold. As the pie cools down, the juices will thicken..

I loved this pie so much that I think I will make several and freeze them uncooked.
Friday, June 5, 2009
Clogged Bathroom Sink
We purchased our home almost a year ago. The kitchen and bathroom are both very modern, but still beautiful and warm. I especially love my bathroom sink, as you can see, it's shaped like a bowl...The only glitch is that it has been "clogged" ever since. Meaning that I have to clean the darn thing 10 times a day or live with toothpaste and other gunky stuff staring at me every time I use the bathroom. It ruins the whole look and is not very hygienic. I did not want to use Drano or other potent chemicals. I have tried pretty much everything, hot water, bleach, vinegar, tweezers...to no avail.. Then I stumbled upon this homemade concoction and VOILA! I now have a perfectly white clean sink :-) I am happy woman
Recipe:
This is the most Eco friendly recipe I have found, and the least expensive as well.
-Mix together 1/2 cup of baking soda and 1/2 of table or coarse salt. (I used regular salt) -pour down in the sink, if you can, remove the drain stopper, mine just unscrews.
-Pour about 1 liter of boiling water down the sink.
-Wait 10 minutes and open the cold water tap for a few minutes, that should clear up everything.
***They recommend to do this once a month as maintenance***

Wednesday, June 3, 2009
My Favorite Spring Salad
Beautiful, isn't it?
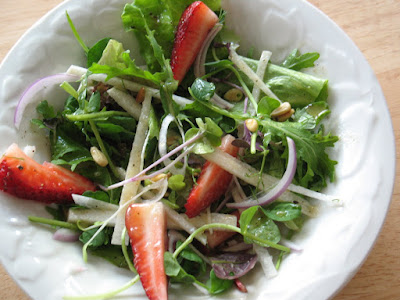
I decided to mix all my favorite salad ingredients together and came up with something amazing!I have a new love: Jicama! I simply love the freshness and crunch of that root vegetable. The taste and texture is somewhat between a potato and apple. It is perfect julienned in salads.
Here are the ingredients, however feel free to add whatever you have on hand..
-Spring salad mix
-A handful of Spring shoots, (pea, onion, beet, or whatever is available)
-Jicama, cut into matchsticks
-Thinly sliced red onion
-Quartered strawberries
-Toasted pine nuts
Friday, May 29, 2009
Knead No More!


 MMMmmmm Warm Bread with Cold Butter
I attempted to make bread only once, and that was 12 years ago; it was long, painful and a disaster.... All this changed yesterday when discovered an amazing way to bake the best bread! This recipe allows anyone to effortlessly bake loaf after loaf of premium artisan goodness. Everyday . . . without kneading the dough! HEAVEN! Frankly, ACE bakery bread is good, but who can afford to pay 4$ for Artisan bread all the time??
Here's how it works:
1) It requires very little yeast;
2) the dough is very wet;
3) no kneading is required;
4) the bread rises for a long time and
5) you can use a closed, pre-heated pot for baking. Together, these factors add up to the tastiest bread I have ever baked.
Crispy Crust:
The last secret to 'Real' Bread is the baking. Professional bakers have long known that the secret of a perfectly crisp crust is moisture. Baking bread in a moist oven keeps the surface supple and allows it to stretch fully before the heat of the oven sets the crust. They also have ovens that inject just the right amount of moist steam, at just the right time.
Here's how it works:
1) It requires very little yeast;
2) the dough is very wet;
3) no kneading is required;
4) the bread rises for a long time and
5) you can use a closed, pre-heated pot for baking. Together, these factors add up to the tastiest bread I have ever baked.
Crispy Crust:
The last secret to 'Real' Bread is the baking. Professional bakers have long known that the secret of a perfectly crisp crust is moisture. Baking bread in a moist oven keeps the surface supple and allows it to stretch fully before the heat of the oven sets the crust. They also have ovens that inject just the right amount of moist steam, at just the right time.
For 1 normal loaf of french style bread
3 cups all-purpose or bread flour
1/4 tsp dry yeast
1 1/4 tsp salt
1 5/8 cups of warm water
For baking in a covered pot
- Whisk the dry ingredients together thoroughly in a glass, plastic or stainless steel bowl.
- Add the water and stir until a wet dough forms. Continue stirring until the dough incorporates all the loose flour in the bowl, about 60 seconds in total.
Cover the bowl with a towel and rest in a warm place for 12 to 18 hours.(I sprinkle flour on top of the bread to avoid it sticking to the towel and prevent it from drying out). - It will double in size, bubble and long gluten strands will form.
- Lightly flour your hands and the work surface then remove the dough from the bowl. Quickly form it into a ball.
- Thoroughly flour a cotton towel and rest the dough on it. Cover it with another floured cotton towel.
You may also rest the dough on a non-stick ‘Silpat’ mat and cover it with just one towel. - Rest the dough a second time. In 2 to 3 hours it will rise again and double in size once more.
- A half an hour or so before the dough is ready preheat your oven to 450 degrees. You may use cast-iron, steel, enamel or ceramic. If at all possible, warm your pot in the oven prior to putting the bread into it.
When the dough has fully risen slide your hand under the towel and quickly invert the delicate dough into the hot pot. - Shake the pot a bit to settle it then place the lid on the pot and start baking.
Bake for 30 minutes with the lid then remove it and bake for 15 minutes more.
Wednesday, May 20, 2009


Green Goddess Dressing
 This gorgeous recipe was provided by our Kundalini teacher, Devinder Kaur from PranaShanti Yoga Center in Ottawa. Everybody in our family raves about this dressing, maybe because we're garlic fanatics...It is a very potent delicious dressing, a little goes a long way. Perfect for a spring cleansing regime!
Ingredients;
3 garlic cloves
Juice of two lemons (approx. 1⁄4 cup)
1 cup cilantro (unchopped)
1 cup parsley (unchopped)
2 Tbsp Bragg Liquid Aminos or Nama Shoyu
1⁄2 tsp umeboshi plum vinegar
1⁄2 cup cold pressed/extra virgin olive oil
1/2 cup water
Procedure;
Blend all ingredients in a blender for 30 seconds. Chill & serve.
Yields 1 cup. Keeps in refrigerator for 5-6 days.
Sunday, May 17, 2009
Ottawa's Tulip Festival

Spring is my favorite season here in Ottawa. I went to the Tulip festival and it reminded me of how beautiful and green this city is. For those of you that are not familiar with the festival, here is a little bit of history:
The Canadian Tulip Festival has grown into the largest Tulip Festival in the world from a gift of International Friendship given six decades ago. In the fall of 1945, Princess Juliana of the Netherlands presented Ottawa with 100,000 tulip bulbs. The gift was given in appreciation of the safe haven that members of Holland's exiled royal family received during the Second World War in Ottawa and in recognition of the role which Canadian troops played in the liberation of the Netherlands.
The tulips have become an important symbol of international friendship and the beauty of spring. They also have special meaning to people of Canada's Capital Region. During the war, the Dutch royal family was hosted at Government House in Ottawa. Princess Margriet was born at the Ottawa Civic Hospital; her hospital room declared "Dutch soil" and the flag of the Netherlands flew on Parliament's Peace Tower.
The first Canadian Tulip Festival was held in 1953. The Ottawa Board of Trade, at the suggestion of world-renowned photographer Malak Karsh whose photographs have immortalized the tulip, formalized the Canadian Tulip Festival to coincide with the tulip's annual bloom. In the next 10 years the Festival grew in size, with a staggering display of over two million flowers. Each spring over 600,000 people from all over North America, Europe and Asia make over a million visits to the Canadian Tulip Festival. Studies show it has a $50 million economic impact annually on the Ottawa region. The event, which grew from the Dutch gift of friendship, has become the world's largest Tulip Festival and Ottawa, with its Official Flower – the Tulip, has become the Tulip Capital of the North America. Isn't that something Eh ! :-)


More pics to come soon....
Monday, April 27, 2009
Daring Bakers Challenge; Cheesecake
Vanilla Bean Creme Brulée Cheesecake :-)

Picture #1
"The April 2009 challenge is hosted by Jenny from Jenny Bakes. She has chosen Abbey's Infamous Cheesecake as the challenge."
I was really excited when I learned that the challenge was cheesecake.
I L-O-V-E cheesecakes. My stepdaughter makes a mean Amaretto cheesecake too...delish.
For this month challenge I tried to recreate the Madagascar Vanilla Bean Creme Brulée cheesecake I had in Toronto... I think I somewhat succeeded, not the same, but a keeper for sure. Abbey's Infamous Cheesecake:
Abbey's Infamous Cheesecake:
Crust:
1 1/2 cups Oreo crumbs
about 4 tbsp. melted butter
Cheesecake:
3 sticks of cream cheese,
8 oz each (total of 24 oz) room temperature
1 cup sugar (I used gold colored organic sugar)
3 large eggs
1 cup heavy cream
1 tbsp. lemon juice
1 tbsp. vanilla extract (I used the innards of a vanilla bean)
DIRECTIONS:
1. Preheat oven to 350 degrees F Begin to boil a large pot of water for the water bath.
2. Mix together the crust ingredients and press into your preferred pan. You can press the crust just into the bottom, or up the sides of the pan too - baker's choice. Set crust aside.
3. Combine cream cheese and sugar in the bowl of a stand-mixer (or in a large bowl if using a hand-mixer) and cream together until smooth. Add eggs, one at a time, fully incorporating each before adding the next. Make sure to scrape down the bowl in between each egg. Add heavy cream, vanilla, lemon juice, and blend until smooth and creamy.
4. Pour batter into prepared crust and tap the pan on the counter a few times to bring all air bubbles to the surface. Place pan into a larger pan and pour boiling water into the larger pan until halfway up the side of the cheesecake pan. If cheesecake pan is not airtight, cover bottom securely with foil (see note at bottom) before adding water. See Pic #2
5. Bake 45 to 55 minutes, until it is almost done - this can be hard to judge, but you're looking for the cake to hold together, but still have a lot of jiggle to it in the center. You don't want it to be completely firm at this stage. Close the oven door, turn the heat off, and let rest in the cooling oven for one hour. This lets the cake finish cooking and cool down gently enough so that it won't crack on the top. After one hour, remove cheesecake from oven and lift carefully out of water bath. Let it finish cooling on the counter, and then cover and put in the fridge to chill. Once fully chilled, it is ready to serve

OOPS! My oven mitt put a dent into the cake
***To avoid a soggy crust, I wrapped the bottom of the pan with 2 layers of plastic wrap, then 2 layers of Heavy Duty foil. After baking the cake, I removed it immediately from the water bath, peeled the foil and plastic film and put it back in the oven on a different rack. I left the water bath in the oven, to create humidity for the 1 hour rest.
Once Fully chilled I sprinkled white sugar all over the top and fired it with a blow torch, see picture # 3
Then I drizzled a caramel sauce on top, consisting of boiled sugar, water, and a bit of cream. See Picture # 1
Et Voila!

Picture #2
 Picture #3
Sunday, April 26, 2009
Cashou's New 'Do
Well, it's that time again, spring time. The pets are shedding enough everyday to knit myself another pet. So it was time for Cashou to get a buzz cut. She hates those bows that PetSmart puts on her. I'm surprised they stayed long enough for me to take pics!


Friday, April 17, 2009
AMAL
This is by far the best movie I have seen this year.

In our cynical world, simplicity is often ridiculed or ignored. Simplicity can be mistaken for simple-minded. Do not make that mistake with Amal.
This enchanting Indo-Canadian film is a modern fable. It depends on elegant simplicity to make its case, to tell its modest story about an auto rickshaw driver in contemporary New Delhi.
Filmed in English and Hindi, Amal is the work of Toronto filmmaker Richie Mehta. Amal made its world premiere as a fully realized film at the 2007 Toronto film festival. This being Canada, a country that is almost paralyzed in its domestic film distribution system, we have been forced to wait another 11 months for the theatrical run to begin. Shameful!
Shot on location in India by a combined Canadian and Indian crew, Amal follows the simple daily life of the title character (played by Canada's Rupinder Nagra). As the man many of us might aspire to be in a state of enlightenment, he is incredibly poor, yet rich in spirit, generosity and selflessness.
I wont divulge anymore of the story, this is a MUST see. Enjoy!
Have a look at the trailer: http://www.poormansproductions.com/amalfeature/
Sunday, April 5, 2009
HONEY! What's That Smell?
5:00 pm Ughhhh....The dog still smells like decaying squirrel! Ewwwwwwwwwwwwwwwww
Pompano Beach Florida
Random pics I took while vacationing in Pompano Beach....
 Best darn Latte I ever had in my life!
 Bonefish...What can I say. Bang Bang Shrimps !!! I LOVE it!
 Million dollar view


 Best darn Latte I ever had in my life!
 Bonefish...What can I say. Bang Bang Shrimps !!! I LOVE it!
 Million dollar view


Cashou's New Eau de "Toilette"


Ahhh Spring...the sun...the birds....the dead things I can roll around in till I cover myself with the most vile, disgusting, unhuman smell.
Friday, April 3, 2009
Product Review

Today I thought that I would post something different then food or pet related.
Hello, I am 35 years old and I still get the odd pimple!
No products have ever worked on those little suckers! Until I found this little gem. It will cost ya, but so worth it! You dab just a tiny bit of powder onto your blemish. I do it first thing in the morning and also throughout the day if the thing is huge and has a pulse, if you know what I mean. It shrinks the thing before your eyes, and you are back to your normal self in a matter of a couple of days. It also helps prevent, meaning at the first sign of a tingle, just put some on the potential spot and Voila!
Love it! Love it! Love it!
This product can be ordered online through Sephora and some stores do carry it.
Friskies Top 10 Reasons "Why I like being a cat"
 10) I get to meow my ass off anytime I want for no reason
9) I get to stay at the Kitty Spa when mom and dad go on vacation
8) I get to drink from the faucet like a civilised cat
7) I live with a dog who keeps the riff raff out of the yard
6) People don't mind when I sit on them
5) I'm so cute I get scratched and massaged just by looking at mom and dad
4) I have my own private mansion where I can sleep on anything I want...especially boxes! I AM KING!

3) I have a bed in every room
2) I get to play under the deck in the yard
And the number one reason I like being a cat...
I get the fame..Cashou gets the blame!
2) I get to play under the deck in the yard
And the number one reason I like being a cat...
I get the fame..Cashou gets the blame!
Cashou's Top Ten reasons "Why I like being a dog"

10) I get to sleep on other peoples clothes
9) I get to go to bed whenever I want (usually every 15 minutes)
8) I don't beg for handouts....I just get whatever falls on the floor
7) I live with a cat that I can torment any time I feel like it
6) I have my own private courtyard where I AM KING!
5) I can go in and out any time by pretending I have to pee
4) If I lie on my back and look cute I always get a belly rub
3) I get the backseat to myself when we go for a drive
2) People don't mind it when I sit on them
And the number one reason I like being a dog....
I can walk around naked all day, every day and not have to pay or worry about what I'm going to wear.
Sunday, March 29, 2009
Daring Bakers Challenge; Lasagne Verte
 Jumbo eggs with twin yolks!
Lasagne is a dish that has successfully transcended borders and is today made around the world, albeit with many variations from the Italian original. Even within Italy, there are many variations and each region has its own lasagne tradition. The dish should always be a “vivid expression of the ‘less is more’ philosophy of cooking. Mere films of béchamel sauce and meat ragu coat the sheerest spinach pasta. Parmigiano-Reggiano cheese dusts each layer. There is nothing more; no ricotta, no piling on of meats, vegetables or cheese; little tomato, and no hot spice. Baking performs the final marriage of flavours. The results are splendid.”
Whew! I'm finally done! This was quite the challenge. I really loved the taste of the spinach in the pasta. So much better homemade then the dried stuff, not sure if I can go back to the dry expensive pasta in a box.. That can only mean one thing! HONEY.... I really NEED a Kitchen Aid mixer with a pasta attachment thing :-) in copper pleeeeeeeeeeeeeeze
The March 2009 challenge is hosted by Mary of Beans and Caviar, Melinda of Melbourne Larder and Enza of Io Da Grande. They have chosen Lasagne of Emilia-Romagna from The Splendid Table by Lynne Rossetto Kasper as the challenge.
Lasagne of Emilia-Romagna (Lasagne Verdi al Forno)
(Serves 8 to 10 as a first course, 6 to 8 as a main dish)
Preparation Time: 15 minutes to assemble and 40 minutes cooking time
10 quarts (9 litres) salted water
1 recipe Spinach Pasta cut for lasagna (recipe follows)#1
1 recipe Béchamel Sauce (recipe follows)#2
1 recipe Country Style Ragu (recipe follows)#3
1 cup (4 ounces/125g) freshly grated Parmigiano-Reggiano
Method
Working Ahead:The ragu and the béchamel sauce can be made up to three days ahead. The ragu can also be frozen for up to one month. The pasta can be rolled out, cut and dried up to 24 hours before cooking. The assembled lasagne can wait at room temperature (20 degrees Celsius/68 degrees Fahrenheit) about 1 hour before baking. Do not refrigerate it before baking, as the topping of béchamel and cheese will overcook by the time the center is hot.
Assembling the Ingredients:
Have all the sauces, rewarmed gently over a medium heat, and the pasta at hand. Have a large perforated skimmer and a large bowl of cold water next to the stove. Spread a double thickness of paper towels over a large counter space. Preheat the oven to 350 degrees Fahrenheit (180 degrees Celsius). Oil or butter a 3 quart (approx 3 litre) shallow baking dish.
Cooking the Pasta:
Bring the salted water to a boil. Drop about four pieces of pasta in the water at a time. Cook about 2 minutes. If you are using dried pasta, cook about 4 minutes, taste, and cook longer if necessary. The pasta will continue cooking during baking, so make sure it is only barely tender. Lift the lasagne from the water with a skimmer, drain, and then slip into the bowl of cold water to stop cooking. When cool, lift out and dry on the paper towels. Repeat until all the pasta is cooked.

 Assembling the Lasagne:
Spread a thin layer of béchamel over the bottom of the baking dish. Arrange a layer of about four overlapping sheets of pasta over the béchamel. Spread a thin layer of béchamel (about 3 or 4 spoonfuls) over the pasta, and then an equally thin layer of the ragu. Sprinkle with about 1&1/2 tablespoons of the béchamel and about 1/3 cup of the cheese. Repeat the layers until all ingredients are used, finishing with béchamel sauce and topping with a generous dusting of cheese.
Baking and Serving the Lasagne:
Cover the baking dish lightly with foil, taking care not to let it touch the top of the lasagne. Bake 40 minutes, or until almost heated through. Remove the foil and bake another 10 minutes, or until hot in the center (test by inserting a knife – if it comes out very warm, the dish is ready). Take care not to brown the cheese topping. It should be melted, creamy looking and barely tinged with a little gold. Turn off the oven, leave the door ajar and let the lasagne rest for about 10 minutes. Then serve. This is not a solid lasagne, but a moist one that slips a bit when it is cut and served.

#1 Spinach Egg Pasta (Pasta Verde)
Preparation: 45 minutes
Makes enough for 6 to 8 first course servings or 4 to 6 main course servings, equivalent to 1 pound (450g) dried boxed pasta.
2 jumbo eggs (2 ounces/60g or more)
10 ounces (300g) fresh spinach, rinsed dry, and finely chopped; or 6 ounces (170g) frozen chopped spinach, defrosted and squeezed dry
3 1/2 cups (14 ounces/400g) all purpose unbleached (plain) flour (organic stone ground preferred)
*The recipe calls for 2 eggs, my pasta was too dry to knead, I added a 3rd egg and a bit of water. Also note in the first picture, one of the egg has twin yolks!
Working by Hand:
Here is what you will need: A roomy work surface, any smooth surface will do, but marble cools dough slightly, making it less flexible than desired. A pastry scraper and a small wooden spoon or blending the dough. A wooden dowel-style rolling pin. In Italy, pasta makers use one about 35 inches long and 2 inches thick (89cm long and 5cm thick). The shorter American-style pin with handles at either end can be used, but the longer it is, the easier it is to roll the pasta. Note: although it is not traditional, I was successful with a marble rolling pin. Cloth-covered chair backs, broom handles, or specially designed pasta racks found in cookware shops for draping the pasta.
Mixing the dough:
Mound the flour in the center of your work surface and make a well in the middle. Add the eggs and spinach. Use a wooden spoon to beat together the eggs and spinach. Then gradually start incorporating shallow scrapings of flour from the sides of the well into the liquid. As you work more and more flour into the liquid, the well’s sides may collapse. Use a pastry scraper to keep the liquids from running off and to incorporate the last bits of flour into the dough. Don’t worry if it looks like a hopelessly rough and messy lump.
 Kneading:
With the aid of the scraper to scoop up unruly pieces, start kneading the dough. Once it becomes a cohesive mass, use the scraper to remove any bits of hard flour on the work surface – these will make the dough lumpy. Knead the dough for about 3 minutes. Its consistency should be elastic and a little sticky. If it is too sticky to move easily, knead in a few more tablespoons of flour. Continue kneading about 10 minutes, or until the dough has become satiny, smooth, and very elastic. It will feel alive under your hands. Do not shortcut this step. Wrap the dough in plastic wrap, and let it relax at room temperature 30 minutes to 3 hours.
 Stretching and Thinning:
If using an extra-long rolling pin work with half the dough at a time. With a regular-length rolling pin, roll out a quarter of the dough at a time and keep the rest of the dough wrapped. Lightly sprinkle a large work surface with flour. The idea is to stretch the dough rather than press down and push it. Shape it into a ball and begin rolling out to form a circle, frequently turning the disc of dough a quarter turn. As it thins outs, start rolling the disc back on the pin a quarter of the way toward the center and stretching it gently sideways by running the palms of your hands over the rolled-up dough from the center of the pin outward. Unroll, turn the disc a quarter turn, and repeat. Do twice more. Stretch and even out the center of the disc by rolling the dough a quarter of the way back on the pin. Then gently push the rolling pin away from you with one hand while holding the sheet in place on the work surface with the other hand. Repeat three more times, turning the dough a quarter turn each time. Repeat the two processes as the disc becomes larger and thinner. The goal is a sheet of even thickness. For lasagne, the sheet should be so thin that you can clearly see your hand through it and see colours. Cut into rectangles about 4 by 8 inches (10 x 20 cm). Note: Enza says that transparency is a crucial element of lasagne pasta and the dough should be rolled as thinly as possible. She says this is why her housekeeper has such strong arms! Dry the pasta at room temperature and store in a sealed container or bag.


Béchamel
Preparation Time: 15 minutes
4 tablespoons (2 ounces/60g) unsalted butter
4 tablespoons (2 ounces/60g) all purpose unbleached (plain) flour, organic stone ground preferred
2 2/3 cups (approx 570ml) milk
Salt and freshly ground pepper to taste
Freshly grated nutmeg to taste
Using a medium-sized saucepan, melt the butter over low to medium heat. Sift over the flour, whisk until smooth, and then stir (without stopping) for about 3 minutes. Whisk in the milk a little at a time and keep the mixture smooth. Bring to a slow simmer, and stir 3 to 4 minutes, or until the sauce thickens. Cook, stirring, for about 5 minutes, until the sauce thickens. Season with salt, pepper, and a hint of nutmeg. **For flavor I always add a few tbsp of grated Parmesan cheese**
#3 Country Style Ragu’ (Ragu alla Contadina)
Preparation Time: Ingredient Preparation Time 30 minutes and Cooking time 2 hours
Makes enough sauce for 1 recipe fresh pasta or 1 pound/450g dried pasta)
3 tablespoons extra virgin olive oil (45 mL)
2 ounces/60g pancetta, finely chopped
1 medium onion, minced
1 medium stalk celery with leaves, minced
1 small carrot, minced
4 ounces/125g boneless veal shoulder or round
4 ounces/125g pork loin, trimmed of fat, or 4 ounces/125g mild Italian sausage (made without fennel)
8 ounces/250g beef skirt steak, hanging tender, or boneless chuck blade or chuck center cut (in order of preference)
1 ounce/30g thinly sliced Prosciutto di Parma
2/3 cup (5 ounces/160ml) dry red wine
1 1/2 cups (12 ounces/375ml) chicken or beef stock (homemade if possible)
2 cups (16 ounces/500ml) milk
3 canned plum tomatoes, drained
Salt and freshly ground black pepper to taste
Working Ahead:
The ragu can be made 3 days ahead. Cover and refrigerate. It also freezes well for up to 1 month. Skim the fat from the ragu’ before using it.
Browning the Ragu Base:
Heat the olive oil in a 12 inch (30cm) skillet (frying pan) over medium-high heat. Have a large saucepan handy to use once browning is complete. Add the pancetta and minced vegetables and sauté, stirring frequently with a wooden spoon, 10 minutes, or until the onions barely begin to color. Coarsely grind all the meats together, including the prosciutto, in a food processor or meat grinder. Stir into the pan and slowly brown over medium heat. First the meats will give off a liquid and turn dull grey but, as the liquid evaporates, browning will begin. Stir often, scooping under the meats with the wooden spatula. Protect the brown glaze forming on the bottom of the pan by turning the heat down. Cook 15 minutes, or until the meats are a deep brown. Turn the contents of the skillet into a strainer and shake out the fat. Turn them into the saucepan and set over medium heat.
Reducing and Simmering:
Add the wine to the skillet, lowering the heat so the sauce bubbles quietly. Stir occasionally until the wine has reduced by half, about 3 minutes. Scrape up the brown glaze as the wine bubbles. Then pour the reduced wine into the saucepan and set the skillet aside.
Stir ½ cup stock into the saucepan and let it bubble slowly, 10 minutes, or until totally evaporated. Repeat with another ½ cup stock. Stir in the last 1/2 cup stock along with the milk. Adjust heat so the liquid bubbles very slowly. Partially cover the pot, and cook 1 hour. Stir frequently to check for sticking. Add the tomatoes, crushing them as they go into the pot. Cook uncovered, at a very slow bubble for another 45 minutes, or until the sauce resembles a thick, meaty stew. Season with salt and pepper.
Subscribe to:
Posts (Atom)


